

A top activity for those visiting Phoenix, Arizona is to conquer the well-known Camelback Mountain hike. Many rate it as a top hike in the area, both for views and for difficulty. If you take on the challenge to summit the camel’s back, you’ll pick one of two trails to ascend just over 1,400 feet. The Echo Canyon Trail is known for its steepness, whereas the Cholla Trail is slightly longer. Both trails are very difficult and require scrambling and maneuvering between boulders.
This post covers everything you need to know about hiking Camelback Mountain via the Echo Canyon trail.
As a reminder, when you make purchases through the links in my post, I may earn commissions at no additional cost to you. As an Amazon Associate I earn from qualifying purchases. As always, I only provide links to products and services I recommend. Read my full disclosure here.
Trail Details:
- Trail Name: Camelback Mountain via Echo Canyon
- Distance: 2.5 miles
- Difficulty: Hard
- Dogs: Not Allowed on Any Portion of Trail
Best Time to Hike Camelback Mountain:
Camelback is a VERY popular hike in Phoenix and can get very crowded, especially on weekends and holidays. To help avoid crowds, I suggest getting to the trailhead as early as possible (it opens at sunrise) and hiking on a weekday, if possible. Know that if crowded, it may take longer to hike since several of the areas require pausing for people going up/down the mountain.
Personally, I enjoy hiking in the winter months as it’s much cooler. However, completing the hike during the summer months will almost certainly ensure less crowds as temperatures commonly exceed 100 degrees. If opting to complete the hike during the summer months, please pay close attention to heat warnings and make sure you have plenty of water.
What to Bring:
- Plenty of Water – I’ll sometimes use a Nathan Insulated Hydration Running Belt since I don’t have a backpack with a bladder and it works great, although I’d choose the running belt or backpack (not both). Using both can be uncomfortable
- Backpack – You should have your arms free for scrambling (I use the Osprey Daylite Daypack for my hikes)
- Sturdy shoes – I wore Brooks Adrenaline running shoes and felt pretty secure with them, although hiking boots would probably be more comfortable and sturdy with the rocks
- Snacks
- Phone/Camera – the views are great!!
- GPS Fitness Watch/App to Track Location & Mileage – (I use the Garmin Forerunner 245 for running and hiking)
Where to Park at the Trailhead:
There is free parking at the trailhead, although it is very limited for such a popular hike. If the parking lot is full, it will be blocked off until spots open up. The neighborhood surrounding the trailhead does not allow for street parking. As mentioned above, I suggest going very early to get a spot. The trailhead also has restrooms and drinking fountains. Please note, the trail closes sharply at sunset and there is a ranger who will ticket cars left in the parking lot after the posted sunset time.
The Hike:
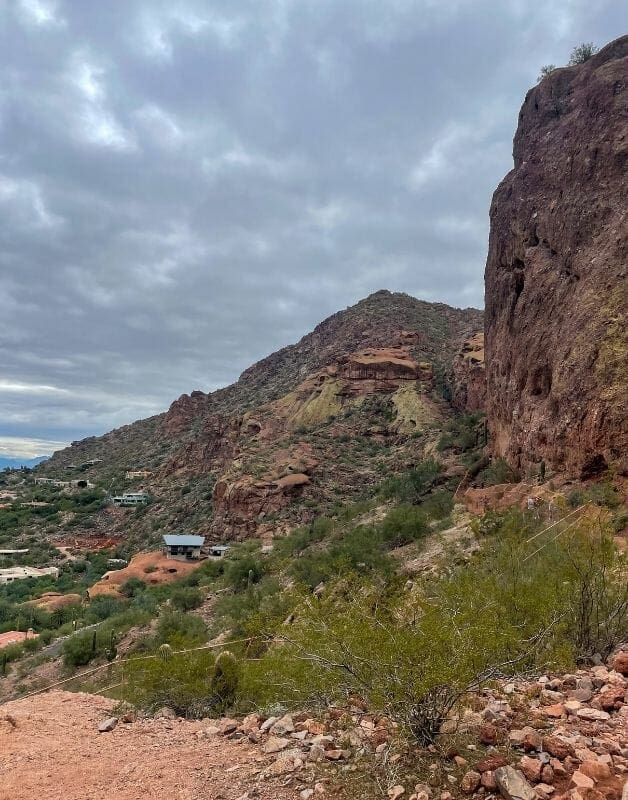
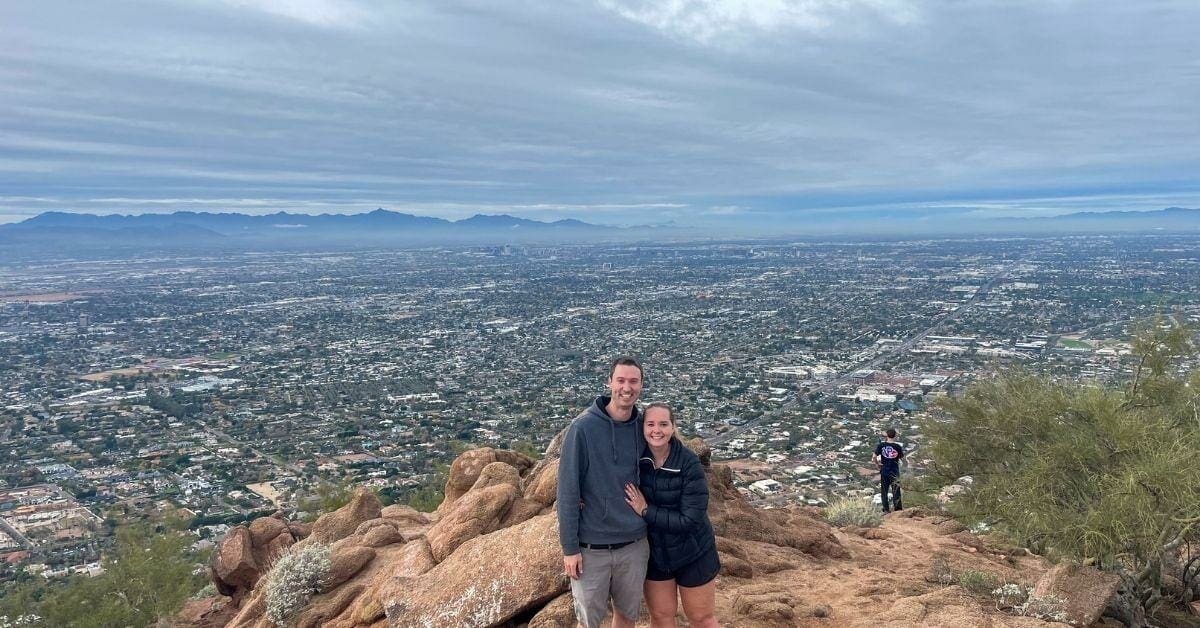
Camelback Mountain is the famed Phoenix hike, especially for tourists, as it is the highest peak in the Phoenix-area. When you reach the summit, you will have gained almost 1300 feet in elevation – wow! You will see plenty of locals on the hike, but I found they tend to be training on Camelback and you may see them running up and down or doing two or three treks for the day.
The first quarter mile or so of the trail is moderately difficult with rocky terrain elevating up from the restrooms and drinking fountains. You’ll reach a lookout and a sign indicating that the next .8 miles of the trail gets much more difficult. I suggest you take a moment here to enjoy the view, drink some water, and make sure you are ready for the rest of the trail.
There is no shame in turning around if you aren’t ready or just not feeling it right then. It’s a very difficult hike and if you do not have much experience with hiking, it may be a better hike to put on your goal list. There’s little to no shade on the trail and several steep drop-offs. Keep in mind that I also found coming down the mountain to be much harder than going up. You really have to watch your footing and it’s a lot of stress on your feet and knees.
Once you continue on, the trail immediately gets steep. Initially, there are several steps to climb, but then it becomes rocky and you start scrambling. There’s a short section with railings, but after that it’s all you. I used my hands and upper body A LOT on this hike, and I could certainly feel it the next day.
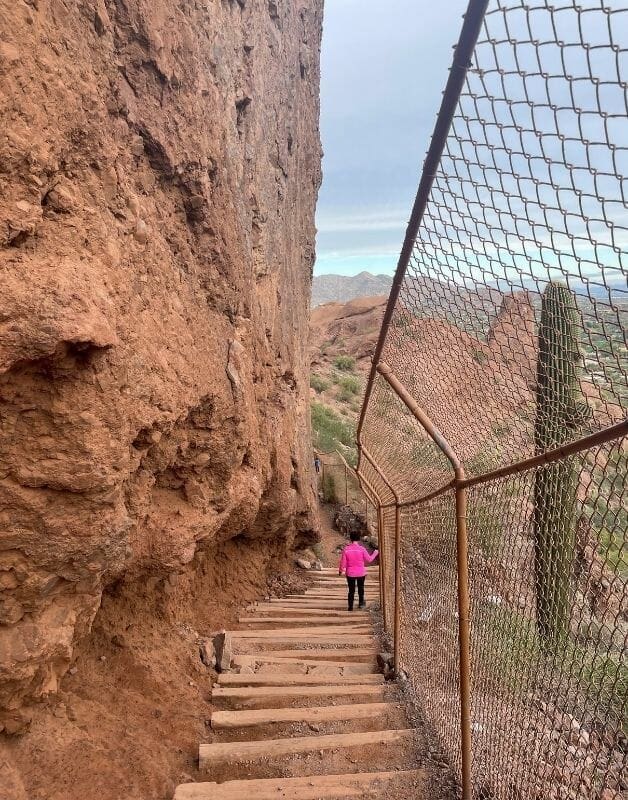
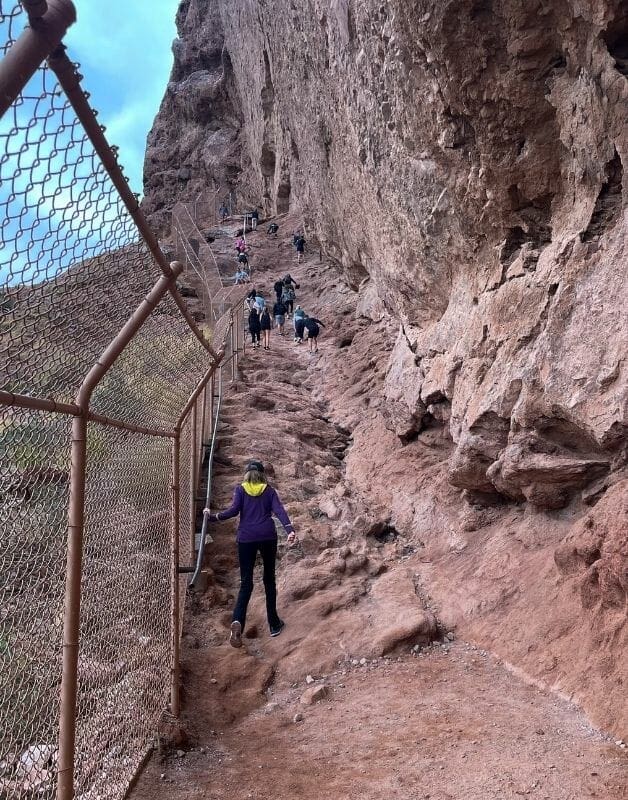
The trail is marked pointing you in the right direction, but it’s up to you to determine the best rocks and footing to get up Camelback. With so many people enjoying this hike, it’s easy to follow the lead of others. However, pay attention to where you are going and please be cautious of fellow hikers.
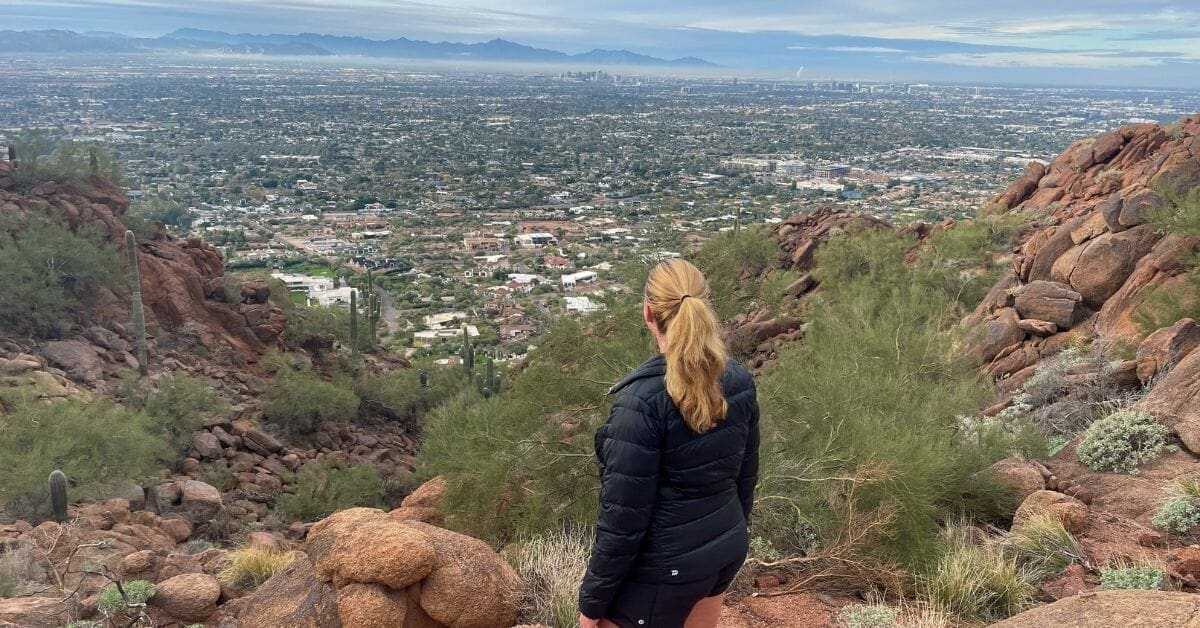
Once you reach the top, find a rock to call home for a second, catch your breath, have some water, and maybe a snack. Then make sure you fully take in the 360 degree views of the entire valley, from Scottsdale to Mesa. You made it to the top!

Look east and you’ll see Scottsdale, Tempe, and Papago Park. Gaze south and you’ll spot planes landing and taking off at Phoenix Sky Harbor Airport, in the shadow of South Mountain. Turn northwest and you’ll see Piestewa Peak, Phoenix’s second highest peak and your next challenge. It’s absolutely incredible and makes the huffing and puffing up the side of the camel totally worth it.
Going down the trail was just as hard, if not harder, than going up. There are so many large steps/jumps you have to take and you really have to watch your footing to avoid slipping or rolling with a rock. It took just about the same time reaching the summit as it did getting back to the parking lot, and we stopped for more photos on the way up.
Post-Hike Thoughts:
Hiking Camelback via Echo Canyon Trail was a very rewarding hike. It was just as difficult as every article stated, but the views were more incredible than I was expecting. It’s hard to imagine city-views being so special, but it’s truly jaw-dropping how vast the valley is and all the mountains surrounding Phoenix.
The hike can get very crowded and I don’t think I’d enjoy it nearly as much if the trail was jam-packed. We summited Camelback in December and started the hike right around 9am. The parking lot was starting to fill up, but by the time we came back down, it was packed and there was a wait to get up or down certain sections of the trail.
Personally, I was sweating the entire hike (up and down), but was so cold when we reached the summit. I was thankful to have my jacket so I could fully appreciate the views at the top, but just know this hike will get your heart pumping.
I’ve also heard that there are some really cool spots to stop off at right along the trail. We didn’t make any detours this trip, but on a future hike up I’d definitely be interested in exploring more. If you know of any of these spots and want to share, I’d love a message with the deets!
Overall, I highly recommend adding this hike to your Arizona bucket list. You won’t be disappointed by the views, and you’ll get an hardcore workout in at the same time. For an equally fun, more-relaxing location in Phoenix, check out my post on Papago Park. My post includes all the details needed for the perfect day.
Happy Hiking!
-Lily


3 thoughts on “A Beginner’s Guide to Hiking Camelback Mountain via Echo Canyon Trail”
I just booked a trip to Phoenix and want to check out Camelback Mountain so good timing to see this! The insight is very helpful. Thank you!
I love a hike with a great view! If I ever make it to Phoenix, I’ll have to check out Camelback Mountain
I live in Phoenix and all our family & friends who come to visit want to hike Camelback! It’s a challenge, but the views are so worth it.